How to Repair Drywall Anchor Holes
How to repair drywall anchor holes depends mainly on whether the drywall around the opening is still firm. For a clean hole, remove the anchor carefully, trim loose material, fill the opening with spackle or joint compound, let it dry, sand it flush, then prime and paint.
If the anchor pulled out and crushed or removed part of the gypsum, use a patch instead of packing the damaged area with filler.
Quick Guide: What Repair Does Your Anchor Hole Need?
Use the condition of the drywall, not just the diameter of the hole, to choose the repair. check this quick reference table.
| What you see | Best repair |
|---|---|
| Small, clean anchor hole | Spackle or joint compound |
| Self-drilling anchor removed cleanly | Spackle or joint compound |
| Loose face paper but firm gypsum | Trim loose paper and skim/fill |
| Molly or toggle hole with sound edges | Fill after removing or recessing the anchor |
| Pulled-out anchor with a shallow crater | Fill if the remaining drywall is firm |
| Crushed or crumbling gypsum | Reinforced patch |
| Larger section of drywall missing | Drywall insert or patch |
| Need another anchor in the same location | Do not rely on a cosmetic filler repair |
The U.S. Consumer Product Safety Commission gives a similar basic process for ordinary drywall anchor holes: remove the anchor, clean the opening, fill it completely, let the filler dry, sand it flush, and repaint.
What You Need
For a normal drywall anchor hole, you only need a few basic tools:
- Spackle or joint compound
- Small putty knife
- Utility knife
- Fine sanding sponge or sandpaper
- Screwdriver or pliers
- Primer
- Matching wall paint
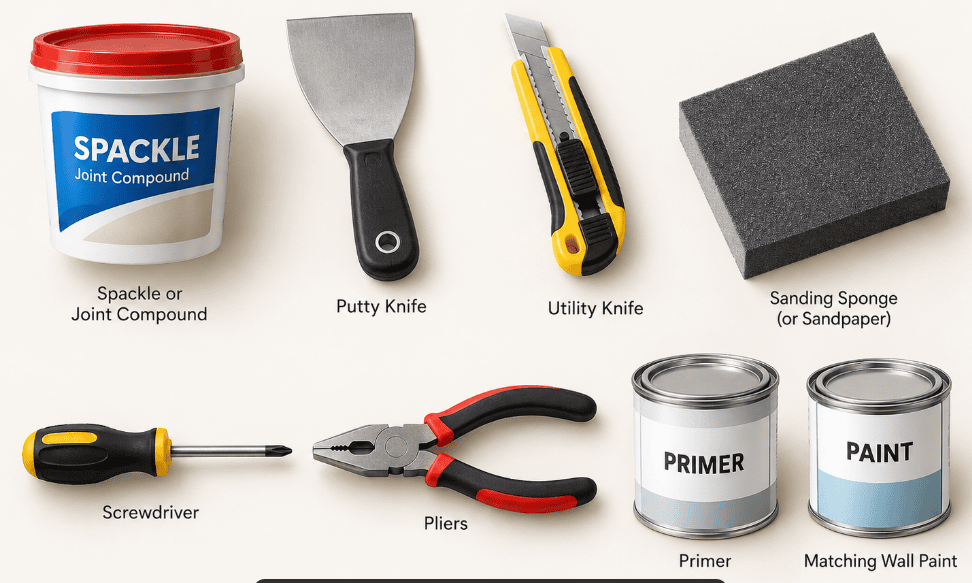
Basic tools used to repair small drywall anchor holes and prepare the wall for paint.For larger damage, you may also need joint tape, a drywall repair patch, or a small piece of drywall.
Wear eye protection and a dust mask if dry sanding creates noticeable airborne dust.
How to Repair Drywall Anchor Holes in 7 Steps
1. Remove the Drywall Anchor Carefully
Your first job is to get the anchor out without turning a small hole into a large one.
The best method depends on the anchor type. The image below shows 4 common types.

Four common drywall anchor types used in hollow-wall installations.Plastic Expansion Anchors
Remove the screw first.
If the plastic anchor is loose, grip the rim gently with pliers and pull it straight out while twisting slightly.
Do not lever the pliers hard against the drywall. That can tear the face paper around an otherwise small hole.
If the anchor resists removal and the drywall starts to tear, stop pulling. With a small plastic expansion anchor, pushing the anchor completely behind the drywall can cause less damage than forcing it outward.
Self-Drilling Drywall Anchors
Most threaded drywall anchors can be backed out by turning them counterclockwise with the correct screwdriver.
Do not pull them straight through the board. Their coarse threads can tear out a much larger section of gypsum.
Molly and Hollow-Wall Anchors
Expanded metal anchors are harder to remove because the sleeve opens behind the drywall.
Remove the screw first. Do not pry the expanded anchor through the face of the drywall.
If the anchor will not come out cleanly, remove the face flange and push the remaining sleeve into the wall cavity. Depending on the anchor design, this may involve carefully drilling or cutting the flange free.
Once the metal sits below the wall surface, you can repair the opening.
Toggle Bolts
With a traditional toggle bolt, the wings normally fall into the wall cavity after you remove the bolt.
There is usually no reason to enlarge the drywall opening just to retrieve them.
The goal with every anchor type the same. You should try to preserve as much sound drywall as possible.
2. Check the Drywall Around the Hole
Press lightly around the opening before applying filler.
A normal anchor hole should still have firm gypsum around it.
A failed anchor may leave:
- torn face paper
- crushed gypsum
- a shallow crater
- soft or crumbling edges
- missing drywall
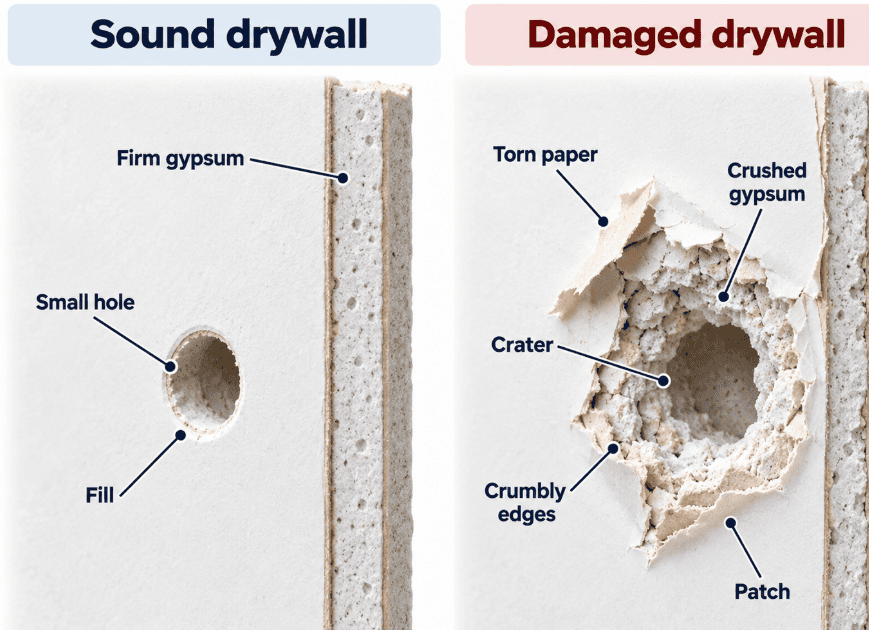
A clean anchor hole in firm drywall can usually be filled, while crushed or crumbling drywall needs a more substantial patch.Loose face paper alone does not mean you need a large patch. USG’s repair guidance recommends removing loose face paper and skim-coating the damaged surface when the board beneath it remains sound. Larger openings and badly damaged panels require more substantial repairs.
3. Trim Loose Paper and Raised Edges
Use a sharp utility knife to remove paper that is already detached.
Do not keep cutting into sound drywall just to make the hole perfectly round.
If the anchor pulled the wall surface outward, carefully trim or flatten the raised edge. A ridge around the opening can remain visible after painting even when the center is properly filled.
Remove loose dust before applying compound.
4. Fill the Hole
For a small anchor hole, press spackle or joint compound into the opening.
Do not simply wipe a thin skin across the wall surface.
Use the putty knife to work the material into the hole, then scrape the surface reasonably flat.
Avoid leaving a large mound. Extra compound only creates more sanding later.
Spackle or Joint Compound?
Both work, but they suit slightly different repairs. check the table below.
| Material | Best use |
|---|---|
| Spackle | A few small cosmetic anchor holes |
| Joint compound | Multiple holes or wider repairs that need feathering |
| Tape + joint compound | Damaged areas that need reinforcement |
| Drywall patch | Missing or badly crushed gypsum |
For one or two ordinary anchor holes, spackle is usually the simplest choice.
Joint compound makes more sense when the repair covers a wider area, requires joint tape, or needs a broad feathered finish.
5. Let the Repair Dry and Recoat if Needed
Follow the drying time listed by the filler manufacturer.
Do not sand while the material is still soft in the center.
A deep anchor hole can shrink slightly as it dries. If the repair leaves a depression, apply a thin second coat and feather it beyond the first.
Two thin coats usually produce a cleaner finish than one heavy coat.
6. Sand the Patch Flush
Sand lightly until the repair blends into the surrounding wall.
Run your fingertips across the area. Your hand often detects a raised edge that is difficult to see.
Once the patch is flush, stop sanding.
Heavy sanding can damage the drywall face paper and create another repair.
Remove the sanding dust before priming.
7. Prime and Paint
Prime the repaired area before applying the finish coat.
Joint compound and other patching materials can have different surface porosity from the surrounding drywall, which can make the repaired area show through the paint. USG recommends sanding and priming repaired drywall once the compound is dry.
After priming, apply matching wall paint.
If the wall has orange-peel, knockdown, or another visible texture, recreate the texture before the final paint coat. A perfectly smooth patch can remain visible on a textured wall even when the paint color matches.
How to Repair a Pulled-Out or Damaged Drywall Anchor Hole
A pulled-out anchor can damage more than the original drilled hole.
It may tear the face paper, crush the gypsum, or pull a shallow section of board away with it.
Start by removing loose material and checking how much firm drywall remains.
If the Drywall Is Still Firm
Trim detached paper and clean the opening.
Fill the hole or shallow crater with spackle or joint compound.
Let the first coat dry. Add a second thin coat if the repaired surface still sits below the surrounding wall.
If the Gypsum Is Crushed or Crumbling
Do not keep forcing filler into weak material.
Remove damaged material back to firm drywall and use a reinforced repair.
A more substantial patch is appropriate when:
- The gypsum around the anchor is crushed.
- The edges keep crumbling as you clean the opening.
- A substantial piece of drywall came out with the anchor.
- The repair would have to bridge an open cavity rather than fill an opening.
- The wall flexes around the damaged area.
- There is not enough firm drywall left to hold a simple filler repair.
For moderate damage, joint tape or a commercial drywall patch may be enough.
For a larger opening, cut back to sound board and install a drywall insert. USG similarly moves from filling small holes to taped repairs and replacement pieces as the damaged area becomes larger.
If the damage extends beyond a local patch and you need to replace a larger area of wall or ceiling, CED’s drywall installation cost calculator can help estimate the replacement work.
Can You Put a New Drywall Anchor in the Repaired Hole?
Do not install a new drywall anchor into a hole repaired only with spackle or joint compound.
The wall may look new after painting, but cosmetic filler does not recreate the original gypsum board.
If you need another fastener in the same area, use one of these approaches.
1. Move the Anchor to Sound Drywall
Install the new anchor in undamaged drywall nearby.
Follow the anchor manufacturer’s instructions for hole size, drywall thickness, and installation.
2. Fasten Into a Stud
If you can position the item over framing, fastening directly into a stud is often the better option.
This is especially important for safety-related furniture anchoring. The CPSC recommends locating a stud and following the restraint hardware manufacturer’s instructions when anchoring furniture. Anchor It
3. Rebuild the Fastening Area
If the fastener must return to exactly the same location, repair the wall properly and provide suitable backing where needed.
Do not expect a plug of dried spackle to carry the load of another anchor.
4. Follow the Actual Anchor Rating
Avoid generic charts that assign one load capacity to every plastic anchor, molly bolt, or toggle.
Capacity depends on the specific fastener, drywall thickness, installation, and loading condition.
Use the manufacturer’s rating for the anchor you install.
7 Drywall Anchor Hole Repair Mistakes to Avoid
1. Pulling the Anchor Out Aggressively
Yanking an anchor through the drywall can turn a small hole into a crater.
Remove it according to the anchor type.
2. Filling Over Loose Material
Patching compound needs a firm surface underneath it.
Trim detached paper and remove crumbling gypsum first.
3. Smearing Filler Only Across the Surface
Press filler into a small opening instead of creating a thin cap over it.
4. Using Spackle Over Crushed Drywall
Weak gypsum needs repair, not camouflage.
Patch back to sound material when the board itself is damaged.
5. Applying One Thick Coat
A thick fill takes longer to dry and can shrink.
Apply another thin coat if the first leaves a depression.
6. Sanding Too Aggressively
Stop once the patch is flush.
Sanding into the drywall face paper creates more work.
7. Installing a New Anchor Into the Cosmetic Patch
A smooth-looking repair is not automatically a new fastening point.
Use sound drywall, framing, or a properly rebuilt area.
Conclusion
For a clean anchor hole in firm drywall, remove the anchor carefully, fill the opening, sand it flush, then prime and paint.
If the anchor crushed or removed part of the gypsum, repair the damaged drywall instead of relying on filler alone.
If you need another fastener in the same location, treat that as a separate fastening problem. A cosmetic drywall repair does not automatically restore the original anchor point.
FAQs
Can I fill a drywall anchor hole with spackle?
Yes. Spackle works well for a small anchor hole when the surrounding drywall remains firm.
Clean the opening, press the spackle into the hole, let it dry, sand it flush, then prime and paint.
Do I need mesh for a drywall anchor hole?
Not for every hole.
A small opening in sound drywall normally needs only filler. Use a reinforced repair when the gypsum is crushed, missing, crumbling, or no longer provides a firm edge.
Can I use joint compound instead of spackle?
Yes.
Joint compound works well for drywall anchor holes and is especially useful when you have several repairs, a wider damaged area, or a patch that requires joint tape.
Spackle is convenient for isolated small holes.
Can I reuse a repaired drywall anchor hole?
Not if you only filled the hole with spackle or joint compound.
Move the new anchor to sound drywall, fasten into framing where appropriate, or rebuild the original fastening area properly.
How Long Should Drywall Filler Dry Before Sanding?
Follow the instructions for the exact product you use.
Drying times vary considerably between lightweight spackle, setting compounds, and conventional joint compound. USG states that conventional joint compound takes about 24 hours to dry at approximately 70°F and 70% relative humidity, while cooler temperatures or higher humidity increase the drying time.